Top Chiropractor in San Leandro, CA

San Leandro Chiropractor

  • About Our Practice
  • What is Chiropractic?
  • SERVICES
    • Personal Injury
    • Cold Laser Therapy
    • Massage
    • Ultrasound
    • Electric Stimulation
    • Sports Injury
    • Workers Compensation
  • Testimonials
  • FAQs
  • Locations
  • CONTACT US
  • New Patient Forms
  • Nutrition Store
  • Tele Chiropractic Health
  • Memberships
  • Home

Powered by Genesis

Back Packs Safety – Back to School and 14 Helpful Tips

September 2, 2010 by drburt

It is not a secret that heavy back (BP) packs for school children are the leading cause of lower back and shoulder pain. I have seen too many children in my almost ten years of my practice suffering from this problem unnecessary. About 40,000,000 students go to school every day. It is crucial that every child carries their schoolpacks properly in order to avoid neck, lower back and shoulder pain.

Make sure the backpack is the right size for your child. The proper size is equal to 75% of your child’s back, meaning the space between the waste and the shoulder blades.
* A child’s back pack weight should never exceed 15% of their body weight according to The Congress of Chiropractic State Association. So this little chart should be helpful.
50 pound child carrying copacity should be no more than 7.5 pounds
80 pound child carrying copacity should be no more than 12 pounds
100 pound child carrying copacity should be no more than 15 pounds
130 pound child carrying copacity should be no more than 19.5 pounds
150 pound child carrying copacity should be no more than 22.5 pounds
* Choose a backpack with padded shoulder straps that sit on both shoulders. BP with one strap such as messenger bags distribute all the weight on one shoulder instead of evenly on both shoulders. Also, bak pack without padded shoulder straps can cause pressure on the nerves that surround the child’s armpits.
Safety tips on how to avoid backpack injuries

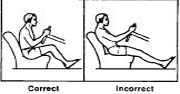
  1. Wear both shoulder straps evenly to properly distribute BP weight.
  2. Get the correct size BP for your child.
  3. The BP should not extend below the lower back. Bigger is not better.
  4. Lighten the load and put the heaviest items in the BP first keeping them the closest to the body.
  5. Lift the BP with your legs and not with your back and place it on one shoulder strap at a time.
  6. Do not leave BP on the floor to avoid someone tripping on them.
  7. Choose a quality BP that has wide well-cushioned shoulder straps with a lumbar support/padding.
  8. Talk to teachers about reducing the need to bring home textbooks or if at all possible have an extra set for home use.
  9. Bend at the knees.
  10. Using both of your hands, check the weight of the BP.
  11. Never sling the BP onto one shoulder and avoid swinging the BP.
  12. Use both shoulder straps at all times. Make them snug but not too tight. Carrying on one shoulder can cause long-term neck, shoulder, back, and postural problems.
  13. Use the stabilizing waste strap if the BP has one present.
  14. Look for signs that BP is poorly fitted or overloaded on a daily basis. A couple signs that the BP is overloaded or not being worn properly is pain, red marks from the  straps, or poor posture.

Being a Safe Backpack Advocate

School’s authorities and children’s  parents must work together in resolving heavy BP issue. The following things can be done by school’s authorities:

  1. allowing students more time in between classes to use lockers
  2. purchasing paperback books
  3. implementing school education programs about safe backpack use
  4. purchasing books on CD-ROM or putting some curriculum on the school’s website, when possible

Adjustment of the backpack would be necessary if one of the following things happened:

  1. Your child struggles to get the BP on or off have back pain and  lean forward to carry the BP
  2. If your child has back pain or numbness or weakness in the arms or legs, talk to your family doctor, chiropractor or physical therapist.

Some  Facts were taken from The Founders of  Backpack Safety America International TM. Visit them at www.backpacksafe.com

The International Chiropractic Pediatric Association (ICPA) endorses the use of Air Pack brand backpacks which are available at www.airpacks.com

Please Leave some comments with your favorite back to school story!

Filed Under: Children, Posture Tagged With: back packs, back to school, backpack, backpack weight, backpacking, backpacks, child carry, children backpacks, clothing, education, fashion, helpful tip, helpful tips, hiking equipment, luggage, medicine, messenger bag, pack safety, packing, safety, safety tips, school child, shoulder pain, shoulder problems, shoulder strap

Healthy Hints For a Healthy Back

September 1, 2010 by drburt

Standing and Walking:

Try to toe straight ahead when walking; put most of your weight on your heels; hold your chest forward and elevate the front of the pelvis as if walking up an incline. Avoid wearing high heels. Stand as if you are trying to touch the ceiling with the top of yur head, eyes straight ahead. All the elements of good posture will flow from these simple maneuvers.

Sitting:

Sit on a hard-back chair with spine pushed back; try to eliminate the hollow in the lower back. If possible, elevate the knees higher than hips while in an automobile. Secretaries should adjust posture chairs accordingly. Sit all the way back in the chair with your back erect.

Lifting:

Bend your knees; squat and lift with your thigh muscles, not your back. Never bend over with your knees straight and lift with the upper torso. Move slowly and avoid sudden movements. Try to avoid lifting loads in front of you above the waste line. Avoid bending over to lift heavy objects from car trunks, as this places a strain on low back muscles

Sleeping:

Sleep on a firm mattress; a ¾ inch plywood bed board is helpful and should be used with all but a very firm orthopedic mattress. With acute back pain, sleep with a pillow or blanket rolled under the knees and a pillow under the head. Keep your knees and hips bent when sleeping on your side.

Driving:

Use a firm seat with a padded plywood or special seal support. Sit close to the wheel with knees bent. On long trips, stop every one to tow hours and walk to relieve tensions and relax muscles

                                                                                                                                                                                                                                                                                                                                                                                                    Working:

Try to avoid fatigue caused by work requiring long standing. Flex hips and knees by occasionally placing a foot on a stool or bench. Take exercises breaks from desk work by getting up, moving around and performing a few back exercises in the standing position.

Question: Did you try these exercises? Were these exercises helpful?

Filed Under: Exercises, Low Back Pain Tagged With: low back exercises, low back pain prevention, low back strengthening, low back support exercises., lumbar exercises, lumbar spine, lumbar spine strengthening, rehabilitation exercises for low back

Ankle Injury and Rehabilitation Options

August 30, 2010 by drburt

 People tend to injure their ankles at least at one point in their lives. Adults who play sports and children alike can sustain an injury. For instance, kids can play outside with their friends and come home complaining about their ankle. They could also hurt themselves by jumping around the bed or playing by themselves at home. Games like basketball, football, soccer or running could cause some serious injury to ones ankle. It’s important to spot the difference on the type of injury suffered by the kids or adults as the injured ankle could have a sprain, strain or have a torn ligament. By knowing the signs, you could treat the injury appropriately.

So, what’s the difference between a sprain, strain or torn ligament? A strained injury happens when you twist the ankle and is usually quite common as the tendon is only stretched but not torn. If it’s a sprained injury, the ligament is partially torn while the torn ligament injury has a completely torn ligament in the ankle.

Ankle injury usually heals by resting and protecting the injured part. Swelling usually occurs and an ice pack would help reduce the swelling. Typical advice by a majority of health care practitioners is to follow a typical advice: R.I.C.E. (Rest, Ice, Compression and Elevation). Though rest alone can heal the injured ankle eventually, as our body naturally can heal itself, this can take a lot of time without proper rehabilitation. Proper rehabilitation process will help to expedite the healing process of the surrounding injured soft tissues around the ankle.  By rehabilitating the injured ankle, you allow the blood to flow into the area and scar tissue build up is prevented. It also gives you a lower risk of future injury as the ankle becomes much stronger and flexible.

Rehabilitation – The process of restoring a person to goo: health, condition, operation, capacity, and life – through the use of therapy and education.

Rehabilitation Therapy – acts as a medical treatment that restores, improves and maintains strength, fitness, movements, and function of areas of the body that have been injured or impaired.

Other treatments for ankle injury are also being offered or studied. One treatment is by thermal therapy for sprained ankles. What it does is it relieves the symptoms of the sprain through heat therapy. But, there’s a different effect for heat therapy as compared to cold therapy. If the sprain is more severe and there’s a lot of swelling, using heat therapy will only worsen it. For milder sprains, you can use the heat therapy treatment. For severe sprains, it has to be avoided.

In heat therapy, timing is important. Heat allows the blood vessels to relax and this means, it can swell. Make sure you time the treatment when the sprain already had a chance to heal enough and the swelling is down. Usually this is 3 days after the injury occurred. By using this therapy, you are allowing your ankle to improve its mobility but it doesn’t help in relieving pain. This is particularly helpful when you start feeling your ankle is stiffening.

Another treatment that is still being studied right now is the “cross-over” effect where you train your uninjured ankle and gain improvement on your injured and immobilized ankle. Clinical studies have shown a small percentage of improvement by training a non-dominant leg with the dominant leg and it’s believed to be the case for the ankles as well. This is because of how our nervous system works. It learns to coordinate movements from one part of the body to the other similar body part by improving it even if the other similar body part is immobilized.

At my clinic I use PT modalities (Electric Stimulation and Moist Heat combination, Ultrasound, Erchonia PL 5000 Cold Laser, Elastic Wrap, CMT (Certified Massage Therapy) and Manual Chiropractic Adjustment). Electric Stimulation helps to bring the pain level down in the first couple of week of the therapy and heat brings more blood to the injured area as well as allows it to be more relaxed for the next step. Next modalities are Ultrasound or Erchonia PL5000 Cold Laser. I alternate them with every other session. Next patient sees my CMT for 15 minutes, My massage therapist breaks the scar tissue down and moves injured ankle through its natural Range of Motion. After massage I adjust an ankle and wrap it witt an elastic wrap for a better support.

Question: Did You Ever Have Ankle Injury? What Kind of Rehabilitation process did you have?

Filed Under: Ankle

Isometric Neck Exercises

August 26, 2010 by drburt

It is best if you do these exercise 2-3 times a day at a different time. Breath air out with a “haaaaa” sound  as you strain during exercises. Hold each contraction for a count of 5.

  1. Place both hands against your forehead.  Push your head forward against the heels of your palms without moving your head. Hold.
  2. Place both hands behind your head.  Pull your head back against your hands while pulling forward with your hands so your head doesn’t move.  Hold
  3. Place your right hand against the right side of your head.  Push your head hard against the heel of your palm without allowing it to move.  Hold.
  4. Place your left hand against the left side of your head.  Push your head against the heel of your palm without allowing it to move.  Hold.
  5. Place your right hand against your right temple.  Try to bring your chin down to your right shoulder without allowing your head to move.  Hold.
  6. Place your left hand against your left temple.  Try to bring your chin down to your left shoulder without allowing your head to move.  Hold.

Question: Did you try these exercises? Were these exercises helpful?

Filed Under: Exercises, Neck Pain Tagged With: cervical spine, exercises, isometric neck exercises, muscle strengthening, neck, rehabilitation

  • « Previous Page
  • 1
  • …
  • 49
  • 50
  • 51
  • 52
  • 53
  • …
  • 59
  • Next Page »

PLEASE FOLLOW & LIKE B.C.

RSS
Follow by Email
Facebook
Facebook
fb-share-icon
Twitter
Visit Us
Follow Me
Post on X
YouTube
YouTube
LinkedIn
LinkedIn
Share
Instagram

Burt Chiropractic Rehabilitation Center

15200 Hesperian Blvd #104

San Leandro, CA. 94578

(510) 481-2225

drburt@burtchiropractic.com

https://shorturl.at/nDHP2

SEARCH

Categories

Recent Posts

  • “Understanding Headaches: Exploring the Role of Chiropractic Care in Relief”
  • Decoding Soft Tissue Injuries: A Comprehensive Exploration of Motor Vehicle Accidents (MVAs) and Their Impact on Health
  • The Role of Chiropractic Care in Whiplash Injury Recovery
Get Microsoft Windows OS or Microsoft Office suite activated free.
Activated kms activator